Wednesday 29 January 2020

CanCon 2020 - Chain of Command: Blitzkrieg 1940

or Who'll come a Larding Matilda with me?


I wanted to share some early shots from the Chain of Command games at CanCon 2020. The theme was Blitzkrieg in the Low Countries, using the Too Fat Lardies Chain of Command 1940s Handbook. The event was masterfully managed by Steve McGuigan, with the incomparable terrain of John Bond (who sadly couldn't be there), and with Scott Driscoll running a CoC boot camp to induct newcomers (and giving some sage advice to those of us still a little green!).  John's tables were as always a joy to behold, and even more joyous to play on. As one of our number remarked, it might be hard now to return to a more routine layout!

I've provided below some shots of the six tables (with their Scenario titles) and one of our two Big CoC double tables from the last half day. My phone/camera and my photographic skills do NOT do credit to the terrain, which was truly spectacular! Just so much fun to game on. Hopefully others will have got better shots than these.

Last Train to Clarkesville
Should I Stay or Should I Go?
Village of the Damned
The Manor Ignored
Chaos Reigns from Above
Messing about in Boats (1)
Messing about in Boats (close up)

Messing about in Boats (2)
Big CoC (Table 2)

As is so often the way with these events, I tend to get somewhat immersed in the game and forget to take photos, but I'll try and use what I have to write up some accounts of specific games in the coming days (or more likely, knowing me, weeks).


Saturday 27 July 2019

False Start at Vizzarri Farm

or "He who hesitates..."


We had a chance last weekend for the first real play-test of the first scenario from my Larino campaign ("To the Viktor Line") at Canberra's Wintercon. The campaign covers an independent action on the fringes of the Battle of Termoli (3-7 October 1943), where the German 16th Panzer Division aimed to throw back a British Eighth Army attempt to outflank via the Adriatic coast one of the German's early defence lines across the Italian peninsula. My campaign follows the 1st East Surrey's action against Kampfgruppe "Schulz" of the 1st Fallschirmjäger Regiment as the Surrey's aim to capture the town of Larino, about 15 miles inland from Termoli.

This first scenario reflects the first contact between the two sides with a British attack on a German outpost in the Vizzarri farm. The scenario is fought as a flanking battle, with the first British attack going in before dawn (so visibility is down to 18" on table). I was playing the British and up against my work colleague and sometimes gaming companion Michael. It was only his second game of Chain of Command, and only my fifth or so (leaving aside a few solo runs), so still learning curves for both of us.

The Vizzarri farm is on the Larino Plateau below the footfills of the Monti dei Frentani and so in very flat and open ground. The farmhouse and surrounding buildings are a mix of single and two storeys, with some tall thick trees to their front and a low olive grove at their rear.

The Vizzarri Farm from the German deployment zone

Michael's Germans had 5 support points, so took some minefields, a medic and the 5cm mortar. I had 20 points of support, so took a couple of carriers with bren teams, an extra 2" mortar team, an on-table Vickers MMG team, a flamethrower team, a forward observer for 4.2" mortars, and a medic. With all that firepower, I should have been raring to go, but my previous experience with Fallschirmjägers made me wary. I had also never used carriers, so was unsure how vulnerable they might be.

We both rolled "5" for our Force Morale, giving me 10 and Michael 11 (given his bonus for elite Fallschirmjägers).

As a flanking scenario, I started off with two sets of three patrol markers along one long edge and one short edge; and Michael had three patrol markers within the German deployment zone in the bottom left corner of the table.

Flank Attack on the Vizzarri Farm: Starting Layout

I had some free moves, but with a roll of "1" was not able to make as much progress as I had hoped. We ended up locked down fairly quickly, giving Michael some good central Jump Off Points, and myself with two sets of JOPs on my two starting table edges. Around the farm, we were sitting at very close quarters. Finally, Michael placed his two minefields about half way up the table on his right flank.

The Vizzarri Farm showing Jump Off Points and
German minefield (XXXX)

[This is all a little closer on the table]

At this point, we made a mistake (only picked up well after the game), and had Michael take the first phase given his higher Force Morale, although I should have taken this as the attacker. He started with a good roll of command dice that allowed him to deploy two sections, one just short of the trees around the most forward farm buildings, the other in the olive grove towards his short base edge.

I wasn't that happy with my first command roll, as it would have meant getting only one section and a team out and if I was to do that on my most forward JOPs, I was worried about being exposed without cover, even though one of the teams could have been a bren carrier (which I was still thinking might be very vulnerable). So I didn't deploy at all! This fear, coupled with my trepidation about the strength of my elite opponents - even though some of his sections were already down men as part of the campaign effects - was to be my downfall for the whole game.

Michael's next phase was a double phase (we were using the 5+1 variant for elite troops, so his odds for this were the same as mine), which allowed him to push forward those sections already out and to add a further section and his senior leaders. By the end of this run, my JOPs closest to his were starting to look very vulnerable. I had also decided - perhaps somewhat over-cautiously - that I would only deploy from these JOPs if I could do so with fairly overwhelming force - and ideally with a double phase.

When my next command rolls proved disappointing - no double phases, nor what I felt was enough to really take enough of the fight up to the ever-encroaching Germans - I started to bring out some of my forces on my short table edge to begin the longer and safer advance under cover of darkness.

The British advancing cautiously
under cover of darkness and smoke

So I otherwise held back and pretty pathetically watched first one and then another of my JOPs closed down and then over-run without doing anything. It was a pretty miserable experience, and somewhere in here Michael managed to play a Chain of Command dice to end the turn, my Force Morale was sitting on 6, and we'd not yet fired a shot in anger!

One British JOP captured and another on the way
to being closed down and captured

I was fairly despairing at this point as my forces edged forward, with one section rounding the minefield but starting to get badly cut up as it tried to advance against the German's flank, and my bren carriers who were just starting to make out their first enemy as they inched ahead in the gloom. It was at this point that we both realised I'd been playing completely the wrong game! The bren carriers started to do some damage and with only a couple of panzerfaust 30s and with his 5cm mortar too far back on the table edge in the olive grove, it became clear that the carriers could have been a game-winner if they'd been brought to bear earlier. But by then my most advanced section was getting really mauled, with a junior leader killed and one team broken, and with my Force Morale falling further (down to 4) I decided to call it a day before losing more casualties.

So this was another lesson for me in the fine art of aggression in war. In some of my earlier games I was too quick to push forward, leaving men exposed and then pulling back in the face of casualties. Here it was the opposite: for fear of being exposed, I let some key strategic ground go, which undermined my morale such that by the time I was in the position to do some damage, my force was perhaps already too vulnerable.

Michael on the other hand displayed a good balance of aggression and caution that allowed him to make the most of my timidity without putting himself in too difficult a position.

In terms of the campaign results, I had seven casualties, including a junior NCO, three of which are now Gone West. Michael lost three, all of whom return.  Michael's CO's opinion has gone up 1 to +1; his men's opinion remains unchanged on +1; and his own outlook has gone from relaxed to cheerful. My CO's opinion has gone down 1 (to 0); my men have significantly lost faith, with their opinion dropping from +1 to -3, so effecting my Force Morale roll next time; and, seemingly oblivious to the opinion of those around me, my own outlook has stayed steady at happy.

I'm happy with how this feels for the campaign test too. It seems like a good mixed balance - the Brits do have loads of support, which can include carriers, but they have to choose to chance it with an all-in fight from the flank and the risk of some fairly bloody ambushes among the farm buildings, or the longer and slower road. Next time we play, I'll not have the advantage of the pre-dawn attack, so will be interesting to see how that plays out.

As is traditional, I will leave the last word to the good Captain, who was travelling with elements of the 78th Division with the aim of catching up with a distant French-Canadian cousin with Le Régiment de Trois-Rivières:

3 October 1943, Parco di San Pardo

Mon Chéri Clafoutis aux Pêches


I am writing to you as the sun rises and its rays filter through this delightful orchard where we had camped for the night, and which reminded me of that lovely orchard on your father's farm, and that even lovelier morning a few years back when... but I am getting distracted. I am about to settle down to enjoy a passable Choucroute garnie with some sausage and saurkraut I managed to find on a dead German a few days ago. I can almost hear your delightful shriek of disgust from here, but searching the dead is something that an Intelligence Officer gets used to, and these petit morceaux are just some of the benefits of what might otherwise be a grisly job!

I've joined with a regiment from East Surrey who are heading up into the central hills above us today and they're up against the German paratroopers. They've had run-ins with them before, and you can tell that they are a little wary of them. I don't blame them - those Diables Verts have a reputation for tenacity and even viciousness in their fighting, so it might be quite a slog. They're good scroungers too, so who knows, I might find some more sausage soon.

Extract from Fortier's War: The Collected Correspondence of Capt. Julien Fortier, 1939-45, edited by a spiritual descendant of the Captain.

Saturday 6 April 2019

"To the Viktor Line" - Work in Progress

or A Draft Chain of Command Campaign


I've been working for some time now on designing some campaigns for Sharp Practice 2 and Chain of Command, and I've finally completed one. The campaign is called "To the Viktor Line" and follows the attack of the 1st Battalion, East Surrey Regiment, on the town of Larino, Italy on 3-4 October 1943. The German defenders were the II. Battalion, 1st Fallschirmjäger Regiment. It is a mostly infantry affair, with the heavy armour active about 15 miles from Larino at the larger and better known battle of Termoli.

I say "completed", but in truth it is only completed on paper; I am yet to try it out on the table. Actually, that's not 100% correct - my last game was a trial run for a scenario that was the start of a campaign that was intended to cover more ground (from before the village of Ururi through to the attack on Larino). I lost that game hands down, which may have played a part here, though I think it was more that I was having difficulty effectively linking what I had as scenarios, and so I went back to the drawing board and the campaign has become a much more contained affair.

In the absence of more of my own play-testing, I am sharing the draft document here (and also on the Too Fat Lardies forum), hoping that others may have a chance to read, play test and provide comments and feedback for corrections,  improvements, and refinements. I am more than happy to receive feedback in comments below.

As I play-test, I will provide AARs and any updates to the document as we go. If I can't muster up my usual gaming suspects, I will probably try some solo plays through to see what works and what needs changing, which I will also post here.

I've posted some extracts below as a taster!


Again, the draft campaign guide is available here and I would welcome comments on this blog or on the shared file.

Tuesday 12 March 2019

Reunion on the road from Serracapriola

or A Partial Play-test of a new Campaign scenario


My irregularity in posting, or at least the long absences between posts, makes me think I should have subtitled this blog, "the record of an occasional wargamer". Still, I am trying to keep a faithful account of the tabletop games I play, and sadly I'm just not getting to the tabletop as frequently as I'd like.

An opportunity came up this long weekend in the form of a visit from an old school friend from PMQ. Tom had touched base with my old wargaming partner Stu, and the three of us decided to get together for a games day. Tom is mostly a role-player, but was keen to try miniatures, and Stu was keen to try Chain of Command (having previously played some Sharp Practice 2).

This also provided an opportunity for me to partially play-test what I was thinking could be the first scenario in To the Viktor Line, a pint-sized campaign I am developing around the 1st East Surreys and 1st Fallschirmjägers at Larino, Italy, in October 1943. The Viktor Line (also known as the Volturno Line) was the German's southern-most defensive line across the Italian Peninsular and was the first organised defensive line facing the Allies following their invasion of the Italian mainland in September 1943. It ran from Termoli on the Adriatic coast, upstream along the Biferno River to the central spine of the Apennine Mountains, which it crossed to follow the Volturno River downstream to its mouth on the Tyhrennian Sea, around 20 miles north of Naples.

By the end of September 1943, the British 8th Army under General Bernard Montgomery was fast approaching the Viktor line at the Biferno River and Termoli, advancing quickly from Taranto and Bari and across the relatively open country beyond Foggia. In front of them, the much depleted 1st Fallschirmjäger Division had been as rapidly falling back. As they approached the Biferno, the Fallschirmjägers were also moving into the foothills of the Apennines, better ground for making a stand.

The campaign covers a small side episode on the fringes of the better known Battle for Termoli (2-7 October 1943). As most of the 78th (Battleaxe) Division were headed for Termoli, the 1st East Surreys, with heavy machine gun and mortar support from the 1st Kensingtons, were sent inland from Serracapriola to neutralise the German forces holding Larino, a key point on the main road and rail routes which run across Italy from Naples to Termoli. The British were attacking to the west through the little village of Ururi with orders to capture and hold Larino and control Highway 87 to Termoli. The German forces of the 1st Fallschirmjäger Regiment at Larino (Kampfgruppe 'Schulz') have orders to delay the British advance and to keep the highway and railroad clear.

As it was, we could only do a partial play-test as I couldn't find enough of my Fallschirmjäger figures on the day, so we used two regular infantry platoons instead. I think this probably gave us a more even match-up for a one-off fight and a more vanilla game than the campaign calls for (with the elite Fallschirmjäger operating under strength).
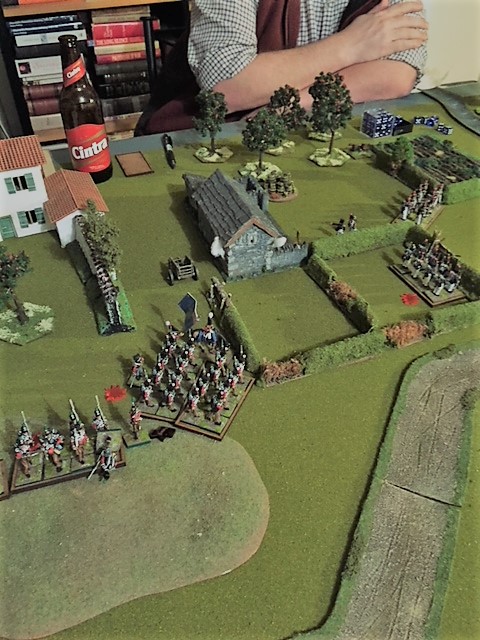
The Battlefield
This first proposed scenario of the campaign is a Probe (Scenario Two in the CoC rules) across the crossing point of a small stream named the Sapestra on the road from Serracapriola to Ururi. The scenario is played length-ways along the table (ie. the players take the shorter table edges), with a road running down the centre length-ways and a stream running at right angles across the centre. The crossing point has a bridge (which the full campaign scenario requires the Germans to blow and gives a bonus support to the British if they can capture it intact; but which we didn't include in this fight).

The road is mostly hedge-lined with some occasional open fencing and gates. The stream also has hedges and occasional small stands of trees lining it. There are a few fields (broken ground), just beyond the stream on the German side of the table. There are two two-story farmhouses with accompanying vineyards on two opposite corners of the table, and a smaller single story building with a smaller vineyard. The photos below provide a guide to the table layout.

The German's defend on the left side of the stream
British attacking from the right

(I have to apologise for the photos from this game; they're never too good, but I'd lost one of my overhead lights and so they are particularly gloomy.)

The Forces
As first-time players, Stuart and Tom were playing the attacking British, each effectively taking one of the roles of the two senior leaders of the regular platoon (Lieutenant and Sergeant) as a "council of war". The HQ had the PIAT team (which I explained was probably unnecessary given I had no armour) and the 2" mortar team; and then three sections, each with its 3-man Bren team and 6-man rifle team. Tom rolled a "6" for support, and they took a Forward Observer and 3" mortar team, a mine clearing team, and a medic.

I was the defending Germans with a regular Grenadier platoon of one senior leader, a 2-man Panzerschreck team; and three sections, each with a 3-man MG42 team and 6-man rifle team. Tom's "6" left me with "3" for support, so I took a minefield, barbed wire and entrenchments for one team.

We each had a Force Moral of 10.

The Patrol Phase
We were both fairly conservative with the Patrol Phase. Four markers each: mine in three stacks of 1-2-1 fairly central in my starting area; theirs in one stack in the centre of their table edge. They received three free moves and advanced mostly up the centre alongside the road, splaying out a little either side. I advanced with the aim of getting up to if not over the stream across a fairly constant front to avoid any British jump-off points getting a jump on a flank. I was fairly happy how things ended up, with two patrol markers over the stream near the long ridge and ensuring the British jump-off points would be well behind the stream. (See photo below.)

Patrol Markers and Jump-Off Points

This left the British with a jump-off point in the vineyard on their right flank (off shot to the left in the photo above), in the woods at their centre, and on the far edge of the table on their left flank (about level with the woods, top of the table in the photo above). I had a jump-off point in the woods just behind the stream on my far left flank; one behind the stream and the hedges and some trees in the centre, and then one right back on my right flank towards my base edge behind a vineyard.

I deployed the minefield to block the bridge and the wire on my far right immediately behind the stream. I kept my entrenchment off table for now.

Into Combat
In the campaign, the British as attacker go first, but we decided to dice for it (given equal Force Morale) and I went first. After my last game of CoC I had vowed that I would be more cautious; not rush to deploy and move, but let them come to me. And how more appropriate would that be in a game were I was clearly the defender, and with a fairly deep defence at that. 

My first Command Dice roll was a 6-6-6-3-2. I was again cursed with a dreaded double phase at the start and, like last time, it immediately led to a rush of blood to the head! My left flank jump-off point was about 24" from their right flank jump-off point. With a double phase, I was enticed into over-confidence that I could shut it down and even capture it before they could get anything deployed on this flank and forcing them on to their left flank which was protected by my engineering works. So one section deployed over the stream on my far left and now around 18" from his right flank jump-off, with the other on my forward centre jump-off point.

My second phase gave me a couple of Chain of Command points and enough for me to follow through my plans for the jump-off shutdown, but with that little cautious voice in my head, I decided to double time with just my riflemen and junior leader (leaving the MG42 team in the trees for cover). I needed to get 14 on 3D6 to get to within 4" to close down their jump-off point. I rolled 11, leaving six men and a junior leader in the open carrying one shock and just 7" from a British deployment point.

The British then rolled and were able to bring on a whole section, and not surprising that they brought it on their right flank. They had the option to sit on the back edge of the vineyard and unleash a fair burst of fire onto my little rifle team, but old "Blood and Guts" Stu was adamant that he wanted a bit of biff, so despite my warnings about the bloodiness of close combat, in they went. It was pretty even (my 10D6 to his 13D6) and it ended with him taking three kills and three shock to my two kills and two shock, throwing him back 6".

The bloody cost of close combat

I was pretty lucky, but still very exposed. On my next phase, I had enough command dice to rally off some of the shock from my exposed forces and put them on a tactical stance, raising their cover to light. I also had enough to bring on another section. I was sufficiently spooked by the prospect of losing my left flank, I decided to bring my last section (with entrenchment!) on to my left behind the exposed team (so also blocking their line of fire – "d'oh!"). So what started out as a short jab to close down the jump-off point suddenly became the whole line of my defence, with my right flank wide open (albeit with the minefield and wire providing some barrier).

On their next phase they brought on the platoon sergeant to their right to rally off some shock and open up fire on my exposed team, killing one man and adding one shock. Of greater concern for me, they brought on the forward observer (FO) for their off-table mortars! They also brought on their two other sections, off each of their central and left flank jump-off points.

The British Left Flank

On my next phase I picked up some more Chain of Command points, giving me almost a full Chain of Command dice (the best part of my game!) and was able to bring on my senior leader to my left to rally what was left of my exposed team. I was also able to fire my MG42 team at his right flank section, but to no effect.

The British had the next phase, and their FO made contact with his battery, and their right flight section rallied some more and fired, killing another of my exposed team (now just two men and junior leader) putting on more shock and pinning them. They also began advancing one of the sections on their left flank. They were setting up for their main push, and I was in some disarray.

Next phase, I dithered again, with a 6-4-4-2-2 and used mostly with my senior leader rallying off the shock and unpinning the exposed team, who were taking up too much of my attention. My MG42 fired again scoring one kill (unfortunately for me not the FO) and putting on some shock.

Then next phase they unleashed hell, calling for an immediate barrage at the mid-point between all of my forces. Stu rolled well, avoiding any deviation, and so pinning nearly all of my troops (four teams and three leaders), who were lucky to lose only two men and take some shock. Ironically, the exposed team was just outside the area of effect, and so was again hit, this time wounding the junior leader. Meanwhile, on the British left they brought on their 2" mortar team and one section moved up to the stream – now half way to its objective, with no opposing forces in front of them, and pretty much of all my forces effectively immobile!

Barrage bang on target!
The Brits wind up for their victory run

At this point, I was lucky enough to get a "6" in my command dice, giving me a full Chain of Command dice and the opportunity to end the turn and so bring the barrange to an end and also revive my injured junior leader. I was also able to finally try to extricate my exposed team, bringing them back towards the line of trees and end of the ridge, but unfortunately still in the open and exposed. I also started to swing my centre section towards the road to attempt to enfilade any British section crossing the stream. Unfortunately, my movement dice were shockers, and I moved only a couple of inches, strung out along the line of the stream.

On the next phase, Tom rolled a 6-4-4-3-2. The platoon sergeant activated the FO who again made contact to call in the barrage. (I realised afterwards we didn't play this correctly - ie. we made it an automatic follow up, rather than testing.) The left flank section crossed over the stream, getting closer to their objective (my base edge) and clear of any shock.

By now I could start to bring my full left flank section to fire on his right section, but I was doing no real damage. My centre section was stumbling to get into position with poor movement rolls and a narrow line of sight through a short stretch of fence either side of the road. I had spread my two full sections more, but was still at risk of a well-targeted barrage. And I did finally get my much diminished rifle team behind the ridge and out of line of sight.

The following phase, given the success of his earlier barrage, Tom called in an immediate barrage, and this time the dice were on my side. He rolled a 3, resulting in a 5D6 deviation; 17" and directly back on to his own positions, including his own Forward Observer! This led to much good-natured recrimination between my two opponents and felt like a reprieve for me.

Hoist on his own barrage

We made a further mess of the rules, struggling to find clear guidance on what the effect of the Forward Observer being subject to his own barrage. In watching other people play Chain of Command, a barrage seems to close down everything within it, so I (wrongly) assumed it meant no movement, firing or activation, and so a FO caught in his own barrage would be unable to react. As I now know that isn't right, and he could have activated in a future phase to end the barrage. Thankfully my error didn't really change the overall outcome, but it made the Brits a little more nervous than they might otherwise have been.

On my next phase I continued to creep my central section into a better firing position to try and stop the end-run of the one British section across the stream. I was still strung out and could only get the MG42 and 2 riflemen firing at half effect, to put on just one shock. My other units were effectively out of the game, unable to shoot into the barrage (which blocks line of sight) but equally safe from the troops within it.

On Stu's next phase his section made a further bolt for home. They rolled badly, but we decided at this point there was no stopping them – his section was in spitting distance of some hills and a house, all of which would give him cover to my base edge, and I was still too strung out to do enough damage – so we called it a British victory.

The winning position

Reflections
Each game continues to be a learning process for me, but I certainly found that the flow of play becomes easier even though there are details in the rules that are easy to overlook or forget. This was something Stu could see too, commenting that a few games under your belt and your consideration and choices would shift from rules towards tactics. I think its a sign of a good base set of rules though that, even with some stuff ups with the rules on the table, it still gives a good gaming experience. I also think it gave Tom a great introduction to miniature wargaming; though maybe not yet enough for a full blown conversion.

I still find the Patrol Phase a challenge, though I was much happier with my outcome this time. I think this is something that would benefit from doing some solo refights just to see how a different set of Patrol choices change the starting positions.

I also received another lesson in the virtue of patience, and what happens when fools rush in! And so once again I take away a commitment to be more cautious in future games.

Finally, it has also caused me to rethink the scope of my planned campaign. The first three scenarios were going to be fairly disconnected, occurring over about 5 miles either side of Ururi, before concentrating in the hills and ridges before Larino. I think now it may be better to focus on that closer fighting in front of Larino to give more of a connection between each scenario. Maybe its not right to judge from just one scenario. Anyway, food for thought.

For this one, I've decided to take just a simple excerpt from the good Captain's war correspondence, with a more general observation about the war in Italy:

30 September 1943, Highway 16, on the Road to Foggia

Mon Camarade Colonel

... Though I am settling in well with these Tommies, and you would think a few years of fighting alongside them would help us understand their humour, but alas! I was in the mess this morning explaining to a Major and two Captains that I am a Frenchman on liaison with the British, fighting the Germans in Italy, and they kept thinking I was trying to tell them a joke about people going into a pub. Crazy Englishmen!...

Extract from Fortier's War: The Collected Correspondence of Capt. Julien Fortier, 1939-45, edited by a spiritual descendant of the Captain.

Saturday 27 October 2018

Somewhere in Normandy

or My first foray with Chain of Command


Four months since my last blog entry means it has been too long between drinks, though included in that was a month on holiday abroad. Still, it's no excuse, so I am hoping to be a little more regular and frequent with both playing and reporting. 

Last weekend I got together with Michael to have our first crack at the Too Fat Lardies (TFL) Chain of Command rules. I've had the rules for a while now and have built up some fairly handy German, British and US mid- to late-war forces. I have been vicariously experiencing games via regular review of the threads and AARs on the TFL forums and the excellent video accounts of Travis of Tabletop CP. But while this gives you a fair understanding of the rules and game-play, it's never the same as getting the figures onto the table and experiencing it for yourself.

So, as an introduction for us we decided to keep it simple - keeping it infantry only (British vs Germans) and using the Patrol Scenario.

Michael was keen to try the Germans, and took a regular infantry platoon (a Senior Leader, a 2-man Panzerschrek team, and 3 Truppen each with a Junior Leader and 1x3-man LMG team and 1x6-man Rifle team). I had a regular British infantry platoon (two Senior Leaders, a 2-man PIAT team, 2-man 2" mortar team, and 3 Sections each with a Junior Leader, 1x3-man LMG team and 1x6-man Rifle team).

We rolled a "2" for supports, meaning just one point each, and given no defensive supports available we both went with an off-table Senior Leader. (I wasn't thinking too much about this, but this was a silly choice for me given that I had two Senior Leaders anyway. As the game played out, I'm really regretting I passed over the medic!)

The Germans started with a Force Morale of 9 and the British started with 11. So fairly evenly matched all round.

Our setting was normal French farmland running up to the edge of a village. There were a few, mostly hedged fields in the centre, including one with vines. The hedges were ordinary farm hedges,  not like the heavy Bocage country of much of Normandy. There was a farm house and outbuildings on the bottom left of the table and the beginnings of the village on the right. A road ran from left to right across the middle of the table, with joining roads from top left (surrounded by woods) and bottom centre. Above the village was cratered ground and a bombed-out manor. There was an open orchard at top centre leading up to the manor and a walled orchard at bottom left running up to the village. There were two rocky outcrops near each of the road junctions and some low hills.

The rough plan of the table and some photos below will provide a better idea of the terrain and layout. We randomly decided our friendly sides, with Michael/Germans at the top and myself/British at the bottom.

"Somewhere in Normandy"
Looking from Bottom Left
Looking from Right
Looking from Top Centre


The Patrol Phase

Chain of Command includes a pre-game Patrol Phase to determine where the players' deployment points will be. This is an abstracted game-within-a-game intended to reflect the first probes and  points of contact for each side's reconnaissance forces, providing identification of suitable points for deployment, known as Jump-Off Points (JOPs).

Richard Clarke - one half of the Two Fat Lardies and author of Chain of Command - has described the deceptively simple Patrol phase as a "short but vital phase of the game". Andy from Tiny Hordes has also provided an excellent overview of how the Patrol phase works.

For our Patrol Phase we each selected 4 patrol markers. I rolled a 6 so was starting below the village (bottom right) and Michael rolled a 4 so started above the central fields (top centre). I was hoping to get something up towards Michael's left flank; he was trying to keep me hemmed in to the corner, which he was pretty successful in doing.

Patrol Markers locked down
I ended up placing two JOPs in the walled orchard and one in a building in the village. Michael placed one among the vines in the centre, one behind the hedge at the top centre, and one behind a cart near the farm outbuildings in the bottom left.

Jump-Off Points in place

Into Combat

With the higher Force Morale I had the initiative and started with what, at the time, felt like a heaven-sent opening roll of the Command dice: 6-6-3-3-3; a double phase and the opportunity to get all of my Junior Leaders and sections on the table. So out went all three sections, one from each of the JOPs. My thinking was to use the next phase if I could to push these sections out and ideally threaten the German deployment points. In hindsight, I think I had a rush of blood to the head and seriously overestimated how far I thought I would get! The next phase gave me some "2"s and "3"s on my Command dice and the sections all moved, effectively pushing further away from each other and towards nothing much in particular! By the end of my double phase I had one section on the wrong side of the fence/hedge of the bottom centre field; one pushing up and around the left-most house of the village; and one moving up towards the cratered terrain.

British 1st Section, Left Flank
British 2nd Section, Centre
British 3rd Section, Right Flank
The next phase saw the Germans bring on a squad off their central JOP with the rifle team inside the small enclosure and the LMG on the road. Michael also added a couple of Chain of Command pips.

Germans bring on their first squad
Over the next couple of phases, I dithered as Michael moved his first squad forward and brought on his Senior Leader and the two remaining German squads: one on his left flank with the rifles heading into the orchard and the LMG team moving behind a hedge; and the other into the centre with the rifles lining the vineyard hedge and the LMG on the road. The Senior Leader was also in the centre, which was looking like where most of the action would be.

I brought on my 2" mortar team with the Platoon Sergeant at the corner of the walled orchard, moved my left flank section over the hedge into the bottom centre field but only slowly forward and the right flank section moved into light cover in the craters and probably in the most effective position of all my sections. However I was not getting any great lines of fire other than the centre Bren team which had already lost a man killed and not doing any damage in return. I started laying some smoke to hinder the German's MG42s which were effective in adding some small amounts of shock to my central section.

The German's strengthen at the centre

The village buildings were providing me cover but no effective fields of fire, with no windows overlooking the German's main central position. I decided to split my centre section, putting the Bren team on the village road between the brown and white houses and with the rifle section going tactical and moving out into the clear on the other side of the white house with the smoke providing my only cover.

Then Michael rolled 6-6-6-4-3 on his Command dice, giving him a double phase and ending the turn in between phases, so also lifting my smoke screen; as well as activation of his Senior Leader and one of his Junior Leaders to get things set up for a stonking!

Unfortunately (as is too often the case for we newbie AAR writers) when the action heats up we forget to take photos! So you will have to rely on my description from hereon in.

For the first in his double phase, Michael advanced his left flank squad further into the orchard, still in cover but almost within striking distance of my right flank section, to which his LMG team had continued to add light casualties and shock . I had earlier reminded him of the German national characteristics and I was pretty sure he was getting ready to pounce. At the centre, he tidied up his rifle firing line and brought his two LMG teams together and both within close range of my centre rifle team that had just broken cover.

On the second of the double phases, with the smoke lifted and enough from his Command dice, he poured in a withering fire onto my central rifle team, knocking out their Junior Leader and adding enough shock and kills to pin them. Given the number of dice he was rolling it's amazing he didn't do more damage, but this was bad enough.

On his left flank, the cry of "Handgranaten!" went up. He was fairly unlucky with his hand grenades, with only one hit adding just one shock, but with his follow-up 3D6 he was easily able to move to initiate close combat. When we started to add up our dice he was not so happy. I'd only lost one man and not a lot of shock (3 points) from the section his team was up against, so Michael had 10 dice to my 21. As it was, Michael had what he called "an arsey* throw" (four "6"s and two "5"s cf. to my six "5s" and no "6"s) - netting us six kills each, but with Michael also inflicting four additional shock and enough to break my section. (* In Australian slang, "arsey" means "to pull something off without skill".) Both our leaders went down wounded, which meant he held the field with one man left and a knocked-out leader, while my chaps bolted. Moreover, they were close enough to the table edge to vacate the field altogether!

My Force Morale plummeted from 11 to 5 in one phase! My next phase I was able to use my Platoon Sergeant to unpin my centre section (actually, now my right flank!) and move all bar the knocked-out junior leader back behind the cover of the white house. I'd also been able to get this section's Bren team into the brown house and bring out my ranking Senior Leader with the PIAT team (I really don't know why I did this).

Michael used his phase to consolidate his MG42 position at the centre, including getting some height to enable fire down on my recently arrived PIAT team, wiping them out immediately and following up by killing my Lieutenant to boot! It was a horror story, but also the price of a really DUMB move on my part. And so my Force Morale dropped to 2.

Given this was a stand-alone game, we decided to play to the end, which came quickly enough. My left section had finally made up enough ground to start to get some fire onto Michael's right flank rifle team, but our fire exchanges were fairly equal and made little impact either way. Michael rolled up another triple "6" with his Command dice, with the effect that the end of turn saw my centre section's Junior Leader revive but now 4" away from his nearest troops and so fully exposed to two MG42s at short range. And with him went my last two Force Morale points!

Reflections

I feel like I have learnt so much from this one game, it is hard to know where to start, so it might be best to start with an overview and then work through some of the specific stages of this game.

We both certainly had an excellent afternoon of wargaming, even if I got a severe pasting! And it has given me even more desire to play more Chain of Command. It also seems to bring to the fore those two key elements of TFL games - command and friction - and I can certainly see why it has such a dedicated legion of fans.

I can see what Richard and others are saying about the importance and subtlety of the pre-game Patrol Phase, and suspect I will always struggle with it. I read recently that it is worth walking around the table during the Patrol Phase to get a more 360° perspective which I will definitely try in future. In our post-game postmortem we agreed that Michael played this perfectly whereas I was probably trying to do too much and cover too many bases. Looking at this mechanism more generally I can also see how this can introduce a significant amount of variation into the game, even if you were using the same terrain layout and forces, and what that can mean for a dynamic campaign game fought within a reasonably confined territory.

I think for both of us our JOP placements were good, but having started with our JOPs where they were, I probably made the mistake of too aggressive a start, particularly given I was probably in a very strong defensive position. My initial double phase didn't help, as it made me feel I could do more than I could. I joked to Michael afterwards that I managed to perfectly combine aggression with indecision, and he was able to capitalize on the combination. Michael also described this as the common wargaming problem of moving because you can, not because you should. Certainly my initial plans of an envelopment on both flanks were ridiculously ambitious (as well as just plain ridiculous), not least of all because I was moving in those directions before any German had deployed!

When reflecting on this, I felt it may have been that I am used to gaming earlier periods and so was not really appreciating the greater range and effectiveness of our weapons here, and feeling instead the need to always close the range. Michael is a little more comfortable with this kind of weaponry (he does a lot of Warhammer 40K and sci-fi wargaming), but in any case he nevertheless seriously out-maneuvered and outplayed me on the day.

I really enjoyed the way the Command dice work in providing your options for unit deployment and activation, including the flexibility of adding some together, as well as the frustrations that it can also deliver when the combination doesn't go your way, reflecting that ever-present friction and reminding you that, while you may be in command, there are limits on what you can control.

I also like the variability of movement - a common feature of TFL games - which further adds to the sense of friction and which works so brilliantly in a WW2 platoon-level skirmish game. There is still much I need to think about and practice when it comes to deploying units to the table. My starting inclination is to deploy as much as I can, if and when I can - I think mostly because I am so used to having all my troops available to me at the start of a game - but I can really see how holding back for the right moment can be so much more effective.  

The firing, shock and casualty mechanisms work much like Sharp Practice 2 and quickly become second nature to run through and apply. What was impressive is the firepower of LMGs, particularly the German's MG42s. I've seen this in many AARs, but it is something else to see it in action. Get two of these triangulating you in their cross-hairs and ... well, you won't be there for long! It may take me some practice before I get the hang of reacting to, as well as better coordinating, this kind of firepower.

This game also reinforced for me the importance of cover in a way which differs again from some of the earlier period wargaming that I am used to (where those things that provide "cover" can be more a hindrance for effective maneuver). Again, I'm sure that practice helps here.

Notwithstanding his "arsey" result, Michael thought that the close combat mechanism is too loaded in favour of the defender - and has had a similar experience with, and reflection on, fisticuffs in Sharp Practice 2 - but I believe it does reflect the genuine bloodiness of close quarters combat in any period, particularly if the defending side has not already been seriously softened up.

So all-in-all Chain of Command really does bring together all these elements into a beautifully constructed and realised whole. I am very keen to get back to the table to try out different troop types and qualities, as well as different support options and different scenarios. I've also been doing some thinking about possible campaigns - both for Sicily and Italy (1943-45) and Western Europe (1944-45) - which hopefully might find their way into future blogs.

Finally, you may have been wondering where the good Captain Fortier has been through all this. Well, as is customary, I will let him have the last word:

18 August 1944, "Somewhere in Normandy"

Ma mie chéri

I so wish to tell you where I am but the censors are still being quite strict, so "Somewhere in Normandy" is all that will get through at this time.

I am yet to find the QG to which I've been assigned for liaison duties, but no-one seems to be missing me too much and so I am traveling with any old unit who'll have me along for a couple of days in the right direction. This morning I messed in with some English chaps from the _______ regiment whose cook had managed to get hold of some pretty fair ham and coffee. 

I got talking with a young Captain relatively fresh from home who was pretty shaken up after his men got something of a mauling yesterday. He welcomed one of my Gitanes and some brandy and told me how his company had been patrolling around the village about 3 miles east from here when a platoon ran into Germans doing the same thing. By his account they were equally matched but his men were inexperienced and maybe a little over-confident and so got leurs culs remis à eux! He lost one of his best young officers - and friends, I'm guessing - and so today he has le cafard. But it is a good lesson that even when the Boche look like they're running they can turn around and blacken your eye! I'm sure it is a lesson Capt. ______ has learned; I'm also sure he will go on learning and look forward to blacking a few Boche eyes himself!

As much as my being back in France warms my patriot's heart, I can tell you I'd prefer to be back in your arms and enjoying the warmth of your bed! Last night, I spent another cold damp night in le Trou de Loup huddled up next to my driver Caporal Gonzague. He smells so much like epoisses, I'm inclined to sleep alone in the jeep, but they do make easy targets ...

Extract from Fortier's War: The Collected Correspondence of Capt. Julien Fortier, 1939-45, edited by a spiritual descendant of the Captain.


Saturday 30 June 2018

Rescue at Cedillo

or Saving Colonel McDougall


Another Sharp Practice encounter fought last weekend, this time introducing my old wargaming partner, Stu, to the mechanics and feel of the game. Again, another Napoleonic Peninsular War fight, and again a randomly selected scenario from the rules - this time, a rescue mission. 

The farmhouse prison of the indiscreet Col. McDougall

And once more, Captain Fortier can best set the scene:

2 June 1809 - Plasencia

I have received orders from [Marshal] Victor to make haste to Cáceres where I am to be involved in the interrogation of a Scottish officer believed to be from Wellesley's staff and engaged in scouting potential lines of advance against Victor's forces in Estremadura. Colonel McDougall was apparently captured in the border village of Cedillo with his pants down (or, as a Scot, would it be his kilt?), so my guess is he was pursuing other advances! However, our Maréchal is increasingly jumpy and sees threats everywhere, so off I will go. 

I am told the good Colonel is currently being held in a small farmhouse just outside Cedillo, but the people in those parts are feared to be too pro-Portuguese, so a small detachment is being sent to bring him in to the safer territory at Cáceres. No doubt another of Victor's fantômes, but at least I will have a chance to catch up with my old friend Major Durrand, who is leading the party bringing him in. 

Capt. Fortier, dressed idiosyncratically in his Ionian Division uniform,
planning his route to
Cáceres

Editor's note: Fortier's hunch was correct. Colonel Dugald McDougall had been at one stage attached to Wellesley's staff, but his constant dalliances led to his reassignment back to England. So he was not on any scouting mission, but rather pursuing a last secret assignation with the beautiful wife of a local Spanish merchant. He had been discovered climbing out of a window by some patrolling French Dragoons, who had locked him up in a nearby farmhouse and sent word back to Cáceres, thus Fortier's orders.

At the same time, word of the Colonel's capture had got back to Colonel Drummond who was holding the Tagus crossing at Vila Velha de Rodão with men from the Royal Loamshire Regiment, and who immediately began organising a rescue mission.

Extracts from The Peninsular War diary of Captain Jules Fortier as edited by a spiritual descendant of the Captain.

Stuart chose the French, with a force consisting of two units of Line Infantry (conscript and volunteers), each of three groups, and each unit under a Status II leader (Lt. Roux's 104e Ligne from Burgundy and the 77e Ligne from Picardy under Lt. Bertrand, known to his friends as “Plastique”); the Status III leader Capt. Lefebvre and his single-group unit of Dragoons ("Lefebvre's Lurkers"); and the whole force under Major Durrand (Status III) with his single-group unit of skirmishers ("Durrand's Devils"). For his support, Stuart took a scout (with an additional deployment point), a marksman, and a couple of musicians. The French starting Force Morale was 10.


I had the British rescuers, made up of detachments from the Royal Loamshire's: one two-group unit of Regular Line under Capt. Bertie ffynch-Hatton (Status III and in overall command); one two-group unit of Light Co. in Line under Lt. Jerold Godolming (II); and a single group of Skirmishers under Cpl. Jones (I). There was also a single-group detachment of Rifles under Lt. Arthur Newbold (II). For my supports, I had a marksman, a hasty barricade and a Colour Party (no slinking about in the dead of night for us!). The British Force Morale started on 11.

We were fighting over largely flat farming land, with the Cedillo-Cáceres road running from West to East with a ford crossing a small stream that ran North to South about a third the way across the table. There were three small ridges either the side of the road, some fields and enclosures, and the farmhouse holding Col. McDougall in the South-East.


The Cedillo-Cáceres road, looking South-East to the farmhouse
where Col. McDougall was held captive
As a rescue mission, the British had a deployment point close to the walled farmhouse and their primary deployment point and escape route in the West on the road to Cedillo. The French had a primary deployment point in the small orchard on the South centre of the table, and their scout gave them a secondary deployment point which Stu placed opposite this on the North centre of the table, behind the small central ridge.


I had not properly read the scenario rules, and so gave myself a significant advantage by not having the non-player guard unit present at the farmhouse. Perhaps the pro-British locals had drawn them away. Instead, all I had to do on arriving was batter my way through a stout door, rescue McDougall, and high-tail it back to the primary deployment point and away. Stuart had to stop me.

The game got off to a slow start, with a few short turns seeing the arrival of one of the French line units, in line, just north of the orchard, and the British skirmishers, with a hasty barricade to the South of the road at the river-side edge of the western ridge. 

Cpl. Jones' Loamshire skirmishers warily defend the ford,
and in the distance Lt. Roux's Line Infantry.
The next unit to arrive was the British commander's line infantry, which immediately assailed the farmhouse door to break McDougall free. Unfortunately, their eagerness backfired (aka "random event") and they added to the requirements of the task at hand (pushing the required 10 points to achieve the task up to 14!).

The Rescuers arrive!

The second unit of French line (Bertrand's) then arrived and lined the northern base of the central ridge. This was followed by the Rifles, putting themselves in a defensive position to the north of the Cedillo road exit and immediately laying down an effective fire on the flank of the newly arrived French.

The Rifles' fire immediately starts to tell.
Roux's Line unit sent one group into the enclosed field overlooking the stream to face off the British skirmishers. The next to arrive where the French Dragoons on the left flank of Betrand's line, and then the last British unit, the Loamshire's Light Company in line, arrived across the top of the Western ridge facing down the Dragoons.

The last British unit arrives.
There was still no sign of the last French unit (the single skirmish group, "Durrand's Devils"), while "Lefebvre's Lurkers" (the French Dragoons) lived up to their name, holding off from advancing and preferring to stand back to threaten the British flank and rear once the rescue party was underway. 

Finally, ffynch-Hatton's men broke down the farmhouse door, dragging the chastened McDougall free of his temporary prison and started on their return journey.

"Free at last!"
At first, this proved to be almost as slow as their jailbreak. As they changed formation to column and headed for the road, they were exposed to light flanking fire from Roux's Line infantry which had by this time occupied the stone barn across from the farmhouse.

French fire from the barn adds some light shock to the Loamshires.
To help cover the British rescue party's flank, the Light Company advanced to pour a heavy fire into the French Dragoons.

Lefebvre's Lurkers taking casualties and shock.
I was lucky to have Godolming's Lights come up again early next turn, and with the help of some sharp practice, Lefebvre and the Lurkers were broken and fled the table, causing a hefty drop in the French Force Morale. 

Finally, Major Durrand's skirmishers arrived. Stuart decided to deploy them on the Cedillo side of the stream and aggressively pushed them forward to threaten Cpl. Jones' flank and the British primary deployment point. 

Durrand's Devils rush the British flank.
With their blood up, the Devils used their next turn to rush the British Light Co. skirmishers flank, driving them back with significant damage and shock, and leaving the British primary deployment point exposed.
 
The Devils victorious!
By now, the Loamshires with the freed Col. McDougall had made the road and were starting to move with greater speed towards their exit. Roux had two separated groups of Line available to pour in flanking fire as they passed, and although the British were taking heavy shock, they continued to press on. "Plastique" Betrand's forces were making heavy weather as they attempted to cross the stream, advancing now in column against the British Rifles but carrying an almost crippling level of shock.

The French slowly advance against the British left flank, while
(in the centre) the British rescue party start to wind-up their escape march.

With some helpful command cards, I was able to push the rescue party across the stream, but this then exposed them to some fairly shattering fire from Durrand's Devils.


The British Lights now started their exit run too, bringing some fire onto Roux's group in the enclosure.


Durrand's skirmishers got in another round of fire, killing a few, putting on a load of shock, and breaking the Loamshire's formation, causing a drop in British Force Morale. But in the follow up ffynch-Hatton was able to turn his most solid group and unleash their first fire back at the Devils, causing them to break and flee.

The battered Loamshire line infantry turn to fire their
first round for the game at Durrand's Devils.


The results: the Devils broken and fleeing.
With the French Force Morale now down to 4 and Col. McDougall and the main rescue party with an open road to Cedillo, Stu decided to concede and we called it a day.

It was a great afternoon of wargaming, and as an introduction for Stu, I think the game worked well. He got a sense of the mechanics of the game, and by about half-way our management of turns, choices and consequences were flowing freely. I think he also appreciated the narrative feel of the play, compared to two forces lined up against each other and battering away.

We were both surprised at the way our cruciform deployment points ended up playing out. I think we had both started thinking that I was likely to be the first exposed to French flanking fire, but it turned out more of an initial risk for the French. By the time it was an issue for me, Stu had suffered some significant losses that made it harder for such fire to tell. In hindsight, we reflected that it may have been better for him to hold off deployment until later, even using opportunities for ambuscade, especially with his dragoons, or alternatively, pushing his deployment away from the centre. Certainly, Lefebvre's Lurkers might have more usefully moved East to put more pressure on the British flank and rear, and keeping the Light infantry facing in the wrong direction to help the main rescue party.

For myself, I would like to have had some artillery, but was worried it may have tied me down, though as it was my Rifles and Skirmishers hardly moved. The game also reinforced for me the risk of small single-group units quickly taking shock and ending up in trouble with only a few casualties.

As always, it is best to leave the last word to Fortier:

4 June 1809 - Cáceres

No sooner had I arrived in Cáceres than I discovered that the purpose of my visit had evaporated! Colonel McDougall was rescued yesterday by a small party of British infantry, giving my poor friend Durrand a bloody nose while they were at it!  Henri did however confirm my suspicion that this was more an affair du coeur than affaires militaires.

Of course, news of McDougall's rescue has been received by Victor with even greater alarm than his capture, confirming for our Maréchal the value of his lost prize and exaggerating the size and immediacy of the imagined British forces bearing down on him. No doubt we will shortly abandon Estremadura all because a French general could not keep his spirits up when a Scotsman was caught with his kilt down!

Extracts from The Peninsular War diary of Captain Jules Fortier as edited by a spiritual descendant of the Captain.