or Saving Colonel McDougall
Another Sharp Practice encounter fought last weekend, this time introducing my old wargaming partner, Stu, to the mechanics and feel of the game. Again, another Napoleonic Peninsular War fight, and again a randomly selected scenario from the rules - this time, a rescue mission.
And once more, Captain Fortier can best set the scene:
2 June 1809 - Plasencia
 |
| The farmhouse prison of the indiscreet Col. McDougall |
And once more, Captain Fortier can best set the scene:
2 June 1809 - Plasencia
I have received orders from [Marshal] Victor to make haste to Cáceres where I am to be involved in the interrogation of a Scottish officer believed to be from Wellesley's staff and engaged in scouting potential lines of advance against Victor's forces in Estremadura. Colonel McDougall was apparently captured in the border village of Cedillo with his pants down (or, as a Scot, would it be his kilt?), so my guess is he was pursuing other advances! However, our Maréchal is increasingly jumpy and sees threats everywhere, so off I will go.
I am told the good Colonel is currently being held in a small farmhouse just outside Cedillo, but the people in those parts are feared to be too pro-Portuguese, so a small detachment is being sent to bring him in to the safer territory at Cáceres. No doubt another of Victor's fantômes, but at least I will have a chance to catch up with my old friend Major Durrand, who is leading the party bringing him in.
 |
| Capt. Fortier, dressed idiosyncratically in his Ionian Division uniform, planning his route to Cáceres |
Editor's note: Fortier's hunch was correct. Colonel Dugald McDougall had been at one stage attached to Wellesley's staff, but his constant dalliances led to his reassignment back to England. So he was not on any scouting mission, but rather pursuing a last secret assignation with the beautiful wife of a local Spanish merchant. He had been discovered climbing out of a window by some patrolling French Dragoons, who had locked him up in a nearby farmhouse and sent word back to Cáceres, thus Fortier's orders.
At the same time, word of the Colonel's capture had got back to Colonel Drummond who was holding the Tagus crossing at Vila Velha de Rodão with men from the Royal Loamshire Regiment, and who immediately began organising a rescue mission.
Extracts
from The Peninsular War diary of Captain
Jules Fortier as edited by a spiritual descendant of the Captain.
Stuart chose the French, with a force consisting of two units of Line Infantry (conscript and volunteers), each of three groups, and each unit under a Status II leader (Lt. Roux's 104e Ligne from Burgundy and the 77e Ligne from Picardy under Lt. Bertrand, known to his friends as “Plastique”); the Status III leader Capt. Lefebvre and his single-group unit of Dragoons ("Lefebvre's Lurkers"); and the whole force under Major Durrand (Status III) with his single-group unit of skirmishers ("Durrand's Devils"). For his support, Stuart took a scout (with an additional deployment point), a marksman, and a couple of musicians. The French starting Force Morale was 10.
I had the British rescuers, made up of detachments from the Royal Loamshire's: one two-group unit of Regular Line under Capt. Bertie ffynch-Hatton (Status III and in overall command); one two-group unit of Light Co. in Line under Lt. Jerold Godolming (II); and a single group of Skirmishers under Cpl. Jones (I). There was also a single-group detachment of Rifles under Lt. Arthur Newbold (II). For my supports, I had a marksman, a hasty barricade and a Colour Party (no slinking about in the dead of night for us!). The British Force Morale started on 11.
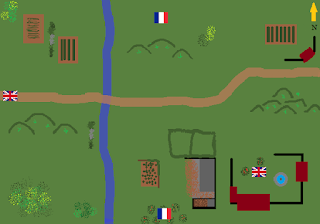
We were fighting over largely flat farming land, with the Cedillo-Cáceres road running from West to East with a ford crossing a small stream that ran North to South about a third the way across the table. There were three small ridges either the side of the road, some fields and enclosures, and the farmhouse holding Col. McDougall in the South-East.


4 June 1809 - Cáceres
No sooner had I arrived in Cáceres than I discovered that the purpose of my visit had evaporated! Colonel McDougall was rescued yesterday by a small party of British infantry, giving my poor friend Durrand a bloody nose while they were at it! Henri did however confirm my suspicion that this was more an affair du coeur than affaires militaires.
Stuart chose the French, with a force consisting of two units of Line Infantry (conscript and volunteers), each of three groups, and each unit under a Status II leader (Lt. Roux's 104e Ligne from Burgundy and the 77e Ligne from Picardy under Lt. Bertrand, known to his friends as “Plastique”); the Status III leader Capt. Lefebvre and his single-group unit of Dragoons ("Lefebvre's Lurkers"); and the whole force under Major Durrand (Status III) with his single-group unit of skirmishers ("Durrand's Devils"). For his support, Stuart took a scout (with an additional deployment point), a marksman, and a couple of musicians. The French starting Force Morale was 10.
We were fighting over largely flat farming land, with the Cedillo-Cáceres road running from West to East with a ford crossing a small stream that ran North to South about a third the way across the table. There were three small ridges either the side of the road, some fields and enclosures, and the farmhouse holding Col. McDougall in the South-East.
 |
| The Cedillo-Cáceres road, looking South-East to the farmhouse where Col. McDougall was held captive |
As a rescue mission, the British had a deployment point close to the walled farmhouse and their primary deployment point and escape route in the West on the road to Cedillo. The French had a primary deployment point in the small orchard on the South centre of the table, and their scout gave them a secondary deployment point which Stu placed opposite this on the North centre of the table, behind the small central ridge.

I had not properly read the scenario rules, and so gave myself a significant advantage by not having the non-player guard unit present at the farmhouse. Perhaps the pro-British locals had drawn them away. Instead, all I had to do on arriving was batter my way through a stout door, rescue McDougall, and high-tail it back to the primary deployment point and away. Stuart had to stop me.
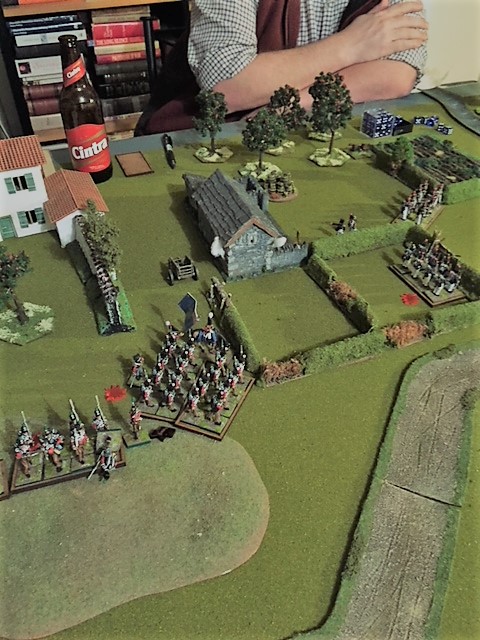
The game got off to a slow start, with a few short turns seeing the arrival of one of the French line units, in line, just north of the orchard, and the British skirmishers, with a hasty barricade to the South of the road at the river-side edge of the western ridge.
 |
| Cpl. Jones' Loamshire skirmishers warily defend the ford, and in the distance Lt. Roux's Line Infantry. |
The next unit to arrive was the British commander's line infantry, which immediately assailed the farmhouse door to break McDougall free. Unfortunately, their eagerness backfired (aka "random event") and they added to the requirements of the task at hand (pushing the required 10 points to achieve the task up to 14!).
 |
| The Rescuers arrive! |
The second unit of French line (Bertrand's) then arrived and lined the northern base of the central ridge. This was followed by the Rifles, putting themselves in a defensive position to the north of the Cedillo road exit and immediately laying down an effective fire on the flank of the newly arrived French.
 |
| The Rifles' fire immediately starts to tell. |
Roux's Line unit sent one group into the enclosed field overlooking the stream to face off the British skirmishers. The next to arrive where the French Dragoons on the left flank of Betrand's line, and then the last British unit, the Loamshire's Light Company in line, arrived across the top of the Western ridge facing down the Dragoons.
 |
| The last British unit arrives. |
There was still no sign of the last French unit (the single skirmish group, "Durrand's Devils"), while "Lefebvre's Lurkers" (the French Dragoons) lived up to their name, holding off from advancing and preferring to stand back to threaten the British flank and rear once the rescue party was underway.
Finally, ffynch-Hatton's men broke down the farmhouse door, dragging the chastened McDougall free of his temporary prison and started on their return journey.
 |
| "Free at last!" |
At first, this proved to be almost as slow as their jailbreak. As they changed formation to column and headed for the road, they were exposed to light flanking fire from Roux's Line infantry which had by this time occupied the stone barn across from the farmhouse.
 |
| French fire from the barn adds some light shock to the Loamshires. |
To help cover the British rescue party's flank, the Light Company advanced to pour a heavy fire into the French Dragoons.
 |
| Lefebvre's Lurkers taking casualties and shock. |
I was lucky to have Godolming's Lights come up again early next turn, and with the help of some sharp practice, Lefebvre and the Lurkers were broken and fled the table, causing a hefty drop in the French Force Morale.
Finally, Major Durrand's skirmishers arrived. Stuart decided to deploy them on the Cedillo side of the stream and aggressively pushed them forward to threaten Cpl. Jones' flank and the British primary deployment point.
 |
| Durrand's Devils rush the British flank. |
With their blood up, the Devils used their next turn to rush the British Light Co. skirmishers flank, driving them back with significant damage and shock, and leaving the British primary deployment point exposed.
 |
| The Devils victorious! |
By now, the Loamshires with the freed Col. McDougall had made the road and were starting to move with greater speed towards their exit. Roux had two separated groups of Line available to pour in flanking fire as they passed, and although the British were taking heavy shock, they continued to press on. "Plastique" Betrand's forces were making heavy weather as they attempted to cross the stream, advancing now in column against the British Rifles but carrying an almost crippling level of shock.
 | |
| The French slowly advance against the British left flank, while (in the centre) the British rescue party start to wind-up their escape march. |
With some helpful command cards, I was able to push the rescue party across the stream, but this then exposed them to some fairly shattering fire from Durrand's Devils.

The British Lights now started their exit run too, bringing some fire onto Roux's group in the enclosure.

Durrand's skirmishers got in another round of fire, killing a few, putting on a load of shock, and breaking the Loamshire's formation, causing a drop in British Force Morale. But in the follow up ffynch-Hatton was able to turn his most solid group and unleash their first fire back at the Devils, causing them to break and flee.
 | |||
| The battered Loamshire line infantry turn to fire their first round for the game at Durrand's Devils. |
 |
| The results: the Devils broken and fleeing. |
With the French Force Morale now down to 4 and Col. McDougall and the main rescue party with an open road to Cedillo, Stu decided to concede and we called it a day.
It was a great afternoon of wargaming, and as an introduction for Stu, I think the game worked well. He got a sense of the mechanics of the game, and by about half-way our management of turns, choices and consequences were flowing freely. I think he also appreciated the narrative feel of the play, compared to two forces lined up against each other and battering away.
We were both surprised at the way our cruciform deployment points ended up playing out. I think we had both started thinking that I was likely to be the first exposed to French flanking fire, but it turned out more of an initial risk for the French. By the time it was an issue for me, Stu had suffered some significant losses that made it harder for such fire to tell. In hindsight, we reflected that it may have been better for him to hold off deployment until later, even using opportunities for ambuscade, especially with his dragoons, or alternatively, pushing his deployment away from the centre. Certainly, Lefebvre's Lurkers might have more usefully moved East to put more pressure on the British flank and rear, and keeping the Light infantry facing in the wrong direction to help the main rescue party.
For myself, I would like to have had some artillery, but was worried it may have tied me down, though as it was my Rifles and Skirmishers hardly moved. The game also reinforced for me the risk of small single-group units quickly taking shock and ending up in trouble with only a few casualties.
As always, it is best to leave the last word to Fortier:
No sooner had I arrived in Cáceres than I discovered that the purpose of my visit had evaporated! Colonel McDougall was rescued yesterday by a small party of British infantry, giving my poor friend Durrand a bloody nose while they were at it! Henri did however confirm my suspicion that this was more an affair du coeur than affaires militaires.
Of course, news of McDougall's rescue has been received by Victor with even greater alarm than his capture, confirming for our Maréchal the value of his lost prize and exaggerating the size and immediacy of the imagined British forces bearing down on him. No doubt we will shortly abandon Estremadura all because a French general could not keep his spirits up when a Scotsman was caught with his kilt down!
Extracts
from The Peninsular War diary of Captain
Jules Fortier as edited by a spiritual descendant of the Captain.


